

| Quick answer: To repair cracked or crumbling brick, first find and stop the cause, usually water. Then rake out the failed mortar, repoint with a matching mix, replace any spalled bricks, and cure the work slowly. Small ground-level jobs are realistic DIY. Stair-step cracks, bulging walls, work above one storey and heritage brick need a mason. |
Brick is one of the most durable materials on a house, but its mortar joints are designed to wear out first. In Metro Vancouver, steady rain keeps masonry wet for much of the year, and water that freezes inside a cracked joint widens it. Once joints crumble, water gets behind the brick and can break the brick face. A cheap fix becomes an expensive one.
This guide explains how to tell a cosmetic problem from a serious one, how to repair mortar and replace a brick step by step, what to avoid, and when it’s smarter to call a mason.
In this guide
- What is brick and mortar repair?
- Signs your brick needs repair
- What causes bricks to crack and mortar to crumble
- Crack types and what they usually mean
- Tools and materials
- How to repair crumbling mortar
- How to replace a cracked or spalled brick
- Mistakes to avoid and whether to seal
- DIY or professional
- What affects the cost
- When to call a mason
- FAQ
What Is Brick and Mortar Repair?
Brick and mortar repair restores a brick wall’s weatherproofing and strength by replacing failed mortar joints, swapping out cracked or spalled bricks, and fixing the moisture or movement that caused the damage. It applies to exterior walls, steps, retaining walls and brick veneer. Repairing the cause matters as much as repairing the damage.
Two terms come up often. Repointing means replacing failed mortar joints while keeping the bricks. Tuckpointing is a decorative finish added on top. We explain the difference in our guide to repointing vs. tuckpointing.
Signs Your Brick Needs Repair
Brick problems usually show up slowly. Watch for:
- Mortar that is crumbling, sandy, or recessed deeper than about 6 mm (¼ inch)
- Mortar you can scrape out with a key or screwdriver
- Brick faces that flake or peel away (spalling)
- Cracks that run through bricks or step along the joints
- White, chalky deposits on the surface (efflorescence)
- Loose, shifting or missing bricks
- Damp patches, peeling paint or stains on interior walls beside brick
- Sections of wall that bulge or lean
One hairline crack isn’t an emergency. Several of these together, or any that are getting worse, are worth acting on this season.
What Causes Bricks to Crack and Mortar to Crumble?
- Water. Rain soaks into porous mortar and, on shaded or north-facing walls, can stay for weeks. Water that freezes in a cracked joint expands and widens it. Our guide on how Vancouver’s rain damages chimneys and masonry explains the cycle in more detail.
- Age. Mortar is commonly cited as lasting about 25 to 30 years, and less on walls that stay wet.
- The wrong mortar. Mortar should be softer than the brick, so it wears first and is easy to replace. Hard, cement-rich mortar on older, softer brick makes the brick take the damage instead, a point also made in the National Park Service’s repointing guidance. Many older Vancouver homes were built with softer, lime-based mortar, so have a mason identify what’s there before repointing.
- Drainage and roof-line leaks. Overflowing gutters, downspouts that dump at the wall, soil piled against brick and failed roof flashing keep walls wet.
- Movement. Settlement, tree roots and rusting steel lintels above windows can crack masonry.
- Harsh treatment. High-pressure washing, paint and non-breathable coatings trap moisture or erode the surface.
Crack Types: What They Usually Mean
Crack patterns are clues, not a diagnosis. Use this table to decide what to do next.
| Crack | What it can indicate | Next step |
|---|---|---|
| Hairline, vertical, in the mortar | Minor shrinkage or temperature movement | Seal or repoint as maintenance |
| Stair-step along the mortar joints | Possible settlement or foundation movement | Have a mason or structural engineer assess it before repairing |
| Horizontal crack along a joint | Possible lateral pressure, a failed lintel or a wall-tie problem | Prompt professional assessment |
| Crack through the brick face | Frost, impact or movement | Replace the brick and find the cause |
| Wider than about 6 mm (¼ inch) or growing | Possible active movement (a common rule of thumb) | Assessment before any repair |
| Bulging or leaning wall | Possible structural problem | Don’t DIY. See our structural masonry repair guide |
Tools and Materials for a Small Brick Repair
For a few joints or one brick you can reach safely from the ground, you’ll typically need:
- Tools: plugging chisel and hammer, pointing trowel, jointing tool, stiff brush, vacuum and a spray bottle.
- Materials: a mortar mix matched to your wall (Type N suits most modern brick; older, softer brick often needs a softer, lime-based mix), and a replacement brick if needed. Test the mortar colour on a hidden spot, because mortar dries lighter.
- Safety gear: eye protection, gloves and a fitted respirator rated for fine dust. An N95 is a common minimum, and a half-mask with P100 filters protects more.
How Do You Repair Crumbling Mortar Between Bricks?
Repointing replaces failed mortar while keeping the bricks:
- Fix the cause first. Repair the leaking gutter, redirect the downspout and clear soil from the wall, or the new mortar will fail too.
- Pick the weather. Work above about 4°C (40°F), out of strong direct sun, with no frost or heavy rain forecast for several days.
- Rake out the old mortar. Use a plugging chisel and hammer to remove mortar to roughly 20 to 25 mm (¾ to 1 inch), and at least twice the joint width. Avoid an angle grinder on narrow joints unless you’re experienced, because it chips brick edges.
- Clean and dampen. Brush and vacuum out dust, then lightly wet the joints so dry brick doesn’t pull the water out of fresh mortar.
- Mix a matching mortar. Follow the product instructions, and match both the strength and the colour of the original.
- Pack in layers. Press mortar in about 6 mm (¼ inch) at a time with a pointing trowel until the joint is full.
- Tool the joint. When it’s thumbprint-firm, shape it to match the existing profile and brush off the excess.
- Cure slowly. Mist it lightly in dry weather and protect it from rain and frost for about three days.
Protect yourself from dust. Raking out mortar creates silica dust, a serious health hazard. Wear eye protection and a fitted respirator, mist the wall to keep dust down, and avoid dry grinding. Add a link to current WorkSafeBC silica guidance. Work only from the ground or a stable surface you can reach safely. Anything above one storey is a job for a professional.
How Do You Replace a Cracked or Spalled Brick?
- Cut out the mortar around the damaged brick on all sides with a plugging chisel.
- Remove the brick in pieces, drilling a few holes if needed, without disturbing its neighbours.
- Clean the cavity and lightly dampen it.
- Lay a mortar bed, then butter the top and sides of the replacement brick.
- Slide it in flush, press it into place and fill the gaps.
- Tool the joints to match, and cure as above.
Matching is the hard part. New bricks rarely match old ones in colour, size and texture, so salvaged bricks from a masonry yard often work better on older walls. If bricks are spalling in several places, replacing them without fixing the moisture source just restarts the clock.
Common DIY Mistakes to Avoid
- Using cement-rich mortar or concrete patch on old brick. It’s harder than the brick, so the brick cracks instead.
- Smearing new mortar over crumbling joints without raking them out. It peels away within a year.
- Filling failed joints with caulk or sealant. It traps moisture and looks poor.
- Pressure washing at high pressure. It erodes mortar and drives water into the wall.
- Repointing in frost or hot sun. Mortar that dries too fast or freezes before curing is weak.
- Painting or coating the brick with a film-forming product, which seals moisture in.
Should You Seal Brick After Repair?
Usually not, if the wall is sound and the water source has been fixed. If you want extra protection, use a breathable (vapour-permeable) water repellent after the mortar has cured according to the product’s instructions. Avoid film-forming sealers and paint, which block moisture from escaping and cause spalling.
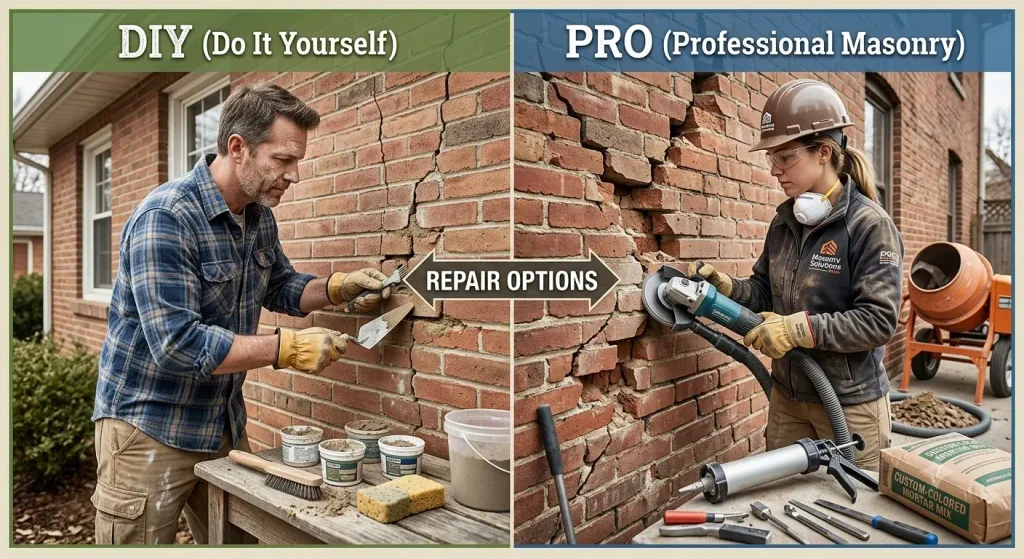
DIY or Professional Brick Repair?
| Situation | DIY realistic? | Why |
|---|---|---|
| A few joints or one brick, reachable from the ground | Yes | Small, low-risk, easy to correct |
| Large wall area | No | Hundreds of joints; consistency and time matter |
| Work above one storey or from a roof | No | Fall risk and silica dust at height |
| Modern fired brick, hairline cracks | Yes | Standard materials, cosmetic damage |
| Older, soft or heritage brick | No | Needs matched lime mortar and brick |
| Stair-step, horizontal or widening cracks; bulging | No | Possibly structural; needs assessment first |
| Recurring damp or unknown water source | No | Diagnosis comes before repair |
The cost of a DIY mistake is high. Too-hard mortar or a visible colour mismatch can’t be undone without grinding the work out and starting over.
What Affects the Cost of Brick Repair?
Prices depend on the job, so treat any figure as a starting point. In Metro Vancouver, small repairs such as a few bricks or joints typically run about $500 to $2,000, while larger repointing and brick replacement jobs are priced by the area repaired. What moves the price:
- Access and height. Work above one storey usually needs staging, which adds cost.
- Area to be repaired. A few joints are a spot repair; a whole wall is a different job.
- Brick age and matching. Older or heritage brick needs matched mortar and brick, which takes more time.
- Depth of damage. The more mortar that has to come out, the more labour.
- The cause. Fixing a leak, flashing or drainage problem adds scope but protects the repair.
For ranges and what affects pricing on structural work, see our masonry repair cost guide.
When to Call a Mason
Call a professional if you see any of these:
- Stair-step or horizontal cracks, or any crack wider than about 6 mm (¼ inch)
- A bulging, leaning or bowing wall
- Sticking doors or windows near the cracked wall
- Water coming through to the inside
- Older or heritage brick that needs a matched mortar
- Damage above one storey
- Spalling or efflorescence that keeps returning after cleaning
Choose someone with masonry-specific experience, a written, itemized estimate and a current WorkSafeBC clearance letter. Our guide to hiring a masonry contractor has the full checklist.
Brick Repair vs. Brick Restoration
Repair fixes specific damaged areas, such as failed joints and broken bricks. Restoration is broader: it returns a whole wall or facade to its original look and performance, often with matched historic mortar, salvaged bricks and careful cleaning. Heritage buildings usually need restoration-grade work, which is covered under heritage restoration on our masonry services page.
Best Time of Year for Exterior Brick Repair
Late spring through early fall is ideal in Metro Vancouver, when there are longer dry stretches and mortar cures at moderate temperatures. Avoid work during prolonged rain or near freezing. The seasonal reasoning in our guide to the best time of year for chimney repair applies to any exterior masonry.
A Recent Brick Repair Job
Use one real job only, with the homeowner’s permission. If you don’t have one, delete this section.
| Detail | Fill in |
|---|---|
| Where | City or neighbourhood |
| Wall and brick | e.g. 1950s brick veneer, ground level, soft older brick |
| What we found | e.g. recessed joints on the north face, two spalled bricks, a leaking downspout |
| What we did | Scope, mortar type used and why |
| Time on site | Real duration |
| Photos | Before and after, each with alt text and a caption |
Where We Repair Brick in Metro Vancouver
Red Brick Chimney Services provides brick and mortar repair across Metro Vancouver, including Vancouver, Burnaby, Surrey, Richmond, New Westminster, Port Moody, Port Coquitlam, Coquitlam and North Vancouver. See examples in our project gallery.
If the damaged brick is on a chimney, that’s a separate job with its own risks. Start with our chimney mortar repair guide, the brick chimney repair guide or the chimney masonry repairs service page.
Brick and Mortar Repair FAQ
How long does mortar last before it needs repair?
Mortar is commonly cited as lasting about 25 to 30 years. Walls that stay wet, face the weather or were repaired with the wrong mortar can need attention much sooner. Crumbling joints, sandy mortar and joints recessed deeper than about 6 mm (¼ inch) are the signs it’s time to act.
Can you repair crumbling brick without replacing it?
If only the mortar is failing, yes: repointing alone fixes it. Bricks with deep spalling or cracks through the unit usually need replacing, because surface patching compounds are cosmetic and rarely last. A mason can tell you which bricks can stay after checking why the wall is wet.
Can you repair spalling brick?
Light surface spalling can sometimes be left alone once the moisture source is fixed and the wall dries, but flaking brick doesn’t heal. Badly spalled bricks should be replaced with a matching brick. Avoid paint or film-forming sealers, which trap moisture and make spalling worse. If it keeps returning, look for the water source.
Can I use cement or concrete patch on brick?
No. Cement-rich patches are harder than most brick and don’t breathe, so moisture and stress concentrate in the brick, which then cracks or spalls. Use a mortar matched to the brick that is softer than the brick itself, and have a mason identify older mortar first.
Is it okay to repair brick in winter?
Generally avoid it. Mortar needs to cure above freezing, and frost damages fresh joints. If the weather is near or below about 4°C (40°F), wait for a dry, milder window. Urgent repairs, such as stopping an active leak, are the exception and are best left to a mason.
Does brick repair need a permit?
Cosmetic repairs like repointing usually don’t. Structural work can, and rules vary by municipality. A reputable contractor will confirm this and handle the application. If you plan structural work yourself, check with your city’s building department before you start.
What’s the difference between repointing and tuckpointing?
Repointing replaces failed mortar to restore strength and weatherproofing. Tuckpointing is a decorative finish added on top. For the full explanation, see our repointing vs. tuckpointing guide.
Get a Brick Repair Assessment
If you’re not sure whether your brick needs a patch or a bigger repair, a quick inspection settles it. Get in touch for a free assessment, or see our full masonry services for what we handle across Metro Vancouver.
Sources
- HomeGuide: repointing and tuckpointing cost (commonly cited 25–30 year mortar life)
- National Park Service, Preservation Brief 2: Repointing Mortar Joints in Historic Masonry Buildings (mortar compatibility with the surrounding masonry)