

Quick answer: Chimney mortar repair replaces only the failed joints, or the mortar cap, with matched mortar. The bricks or stones stay in place. In Metro Vancouver, small spot repairs typically run $300–$700 CAD for brick and $450–$900 CAD for stone, depending on roof access and chimney height. If more than roughly 20–25% of the joints have failed, repointing the whole chimney is usually the better value.
Contents list
- What Is Chimney Mortar Repair?
- Signs Your Chimney Mortar Is Failing
- Why Chimney Mortar Fails in Vancouver
- Brick vs. Stone Chimney Mortar Repair
- Chimney Mortar Cap (Crown) Repair
- Choosing the Right Mortar
- How Much Does Chimney Mortar Repair Cost in Vancouver?
- Mortar Repair vs. Repointing vs. Tuckpointing vs. Rebuild
- How a Mason Repairs Chimney Mortar, Step by Step
- How Long Does Chimney Mortar Repair Take?
- Real Chimney Mortar Repair Jobs in the Lower Mainland
- DIY vs. Professional Mortar Repair
- Where We Repair Chimney Mortar
- Chimney Mortar Repair FAQ
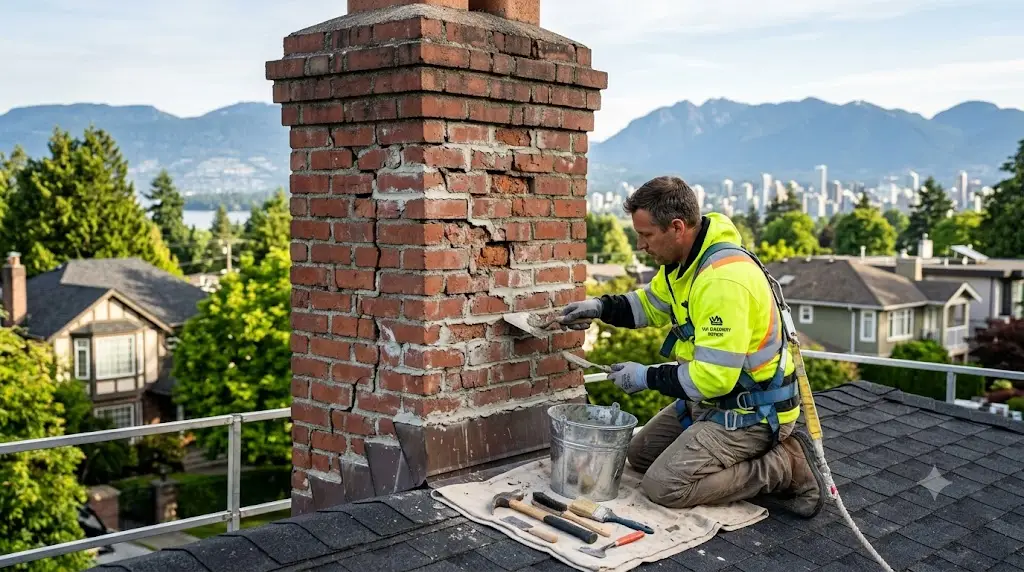
What Is Chimney Mortar Repair?
Chimney mortar repair is the process of removing damaged, cracked, or missing mortar from between chimney bricks or stones and replacing it with fresh mortar matched to the original mix and colour. It restores the structural bond between masonry units and seals the chimney against water penetration, without removing or replacing the bricks or stones themselves.
Mortar repair is typically localized — a mason removes mortar only where it has failed, rather than across the entire chimney. That broader, whole-chimney version of the job is usually called repointing, which is covered separately below.
You’ll also hear the terms repointing and tuckpointing. Repointing means removing and replacing the mortar across the whole chimney. Tuckpointing is a finishing technique that uses two mortar colours to create the look of very fine joints. Mortar repair is the smaller job: fixing only the joints, or the cap, that have failed. We compare all three further down
Signs Your Chimney Mortar Is Failing
Most homeowners don’t notice mortar damage until it’s visible from the ground or shows up as a leak inside the house. Common warning signs include:
- Cracked, crumbling or powdery mortar joints you can scrape out with a fingernail
- Gaps or missing mortar between bricks or stones
- Small piles of mortar sand on the roof, in the gutters or at the base of the chimney
- White, chalky staining (efflorescence) on the chimney exterior, or in the attic near the chimney chase
- Moss, algae or plant growth in the joints
- Loose bricks or stones, or a chimney that looks slightly out of alignment from the ground
- Water stains on the ceiling or wall near where the chimney passes through the house
- Rust or corrosion on a metal damper or firebox, often caused by water tracking down through failed joints above
A safe ground-level check: if you can reach part of the masonry from the ground, such as a basement or low chimney section, press a screwdriver tip gently into a joint. If it sinks in or the mortar crumbles, the joint is failing. Never climb onto the roof to test the chimney.
Leak inside the house? Mortar isn’t the only possible source. Failed counter flashing, a cracked crown or a missing cap can cause the same stains. If you’re seeing more than one of these signs, book a professional chimney inspection before the damage spreads to the flue liner or firebox.ebox.
Why Vancouver’s Climate Makes Mortar Repair Urgent
The Lower Mainland’s wet, mild winters are hard on chimney mortar specifically. Mortar is porous, and repeated freeze-thaw cycles force water that’s soaked into a cracked joint to expand and contract, widening the crack a little more each time. Vancouver’s rainy climate means this cycle happens more often here than in drier regions, which is why mortar joints that might last decades elsewhere can fail within 15–20 years locally — sometimes faster on north-facing or shaded chimneys that never fully dry out between storms.
Why Chimney Mortar Fails in Vancouver
Mortar is porous by design, which lets masonry release moisture. In the Lower Mainland, a chimney above the roofline is exposed to wind-driven rain for much of the year, and shaded or north-facing chimneys may never fully dry between storms. Water soaks into cracked joints, and moss and algae hold that moisture against the masonry. Metro Vancouver sees fewer hard freezes than colder inland regions, but saturated mortar that does freeze expands and widens the crack. The damage builds winter after winter.
Common causes of failing mortar on Lower Mainland chimneys:
- Age. Mortar loses strength and bond over decades of wetting and drying.
- A failed crown, cap or flashing. Water gets in above or beside the joints and saturates the brick below.
- A mismatched earlier repair. Mortar that is harder than the original can crack the brick around it.
- Rushed workmanship. Shallow raking, dusty joints or poor curing mean the new mortar never bonds properly.
Mortar joints commonly need attention within a couple of decades, and sooner on shaded chimneys or where the crown and flashing have failed. Industry cost guides put the repointing cycle for brick and stone at roughly 25 to 30 years. For more on how local weather affects masonry, see how Vancouver’s rainy climate damages chimneys faster.
Brick vs. Stone Chimney Mortar Repair
The repair principle is the same for both, but the materials and technique differ enough that they’re worth treating separately.
Brick Chimney Mortar Repair
Brick chimneys are the most common type in the Lower Mainland, and their mortar joints are typically consistent in width, which makes brick chimney mortar repair relatively straightforward for an experienced mason. The old mortar is ground or chiselled out to a consistent depth — usually 20–25 mm — the joint is cleaned of dust and debris, and new mortar is packed in and tooled to match the existing joint profile. Matching the mortar colour and joint style matters here: a mismatched patch is one of the clearest signs of a rushed repair. For the full range of brick options, see our brick chimney repair guide.
Stone Chimney Mortar Repair
Stone chimney mortar repair is more labour-intensive because stone joints are irregular in width and depth, and the stones themselves are often heavier and less uniform than brick. A mason has to work around each stone individually, which takes more time per square foot than brick work. Stone chimneys are also more prone to larger voids behind the visible mortar line, so a proper repair often means packing the joint in stages rather than a single pass, to keep the new mortar from slumping or cracking as it cures.
Chimney Mortar Cap (Crown) Repair
The top of a masonry chimney is finished with a sloped mortar or concrete surface, called the crown, wash or mortar cap. It sheds water away from the flue and takes more direct weather than any other part of the chimney, which is why it is often the first place to crack. A damaged cap lets water pool and work down into the flue liner and the mortar joints below.
For minor surface cracking, resurfacing and sealing the existing cap can add several years of life. Our chimney crown sealer guide covers what a homeowner can reasonably do and what needs a mason. If cracks go through to the flue tile, or the crown has broken away, chimney crown replacement is usually the more reliable fix.
A mortar cap is not the same as the metal or clay rain cap that sits on top of the flue. If you’re dealing with that part, see chimney pots & rain caps
Choosing the Right Mortar: Type N, Type O, Type S and Lime
Mortar isn’t one-size-fits-all, and the wrong mix is a common cause of failed repairs. The rule masons follow: new mortar should be the same strength as, or softer than, the brick or stone around it, and at least as breathable. Mortar that is harder than the masonry can crack the bricks or trap moisture, so the damage shows up in the brick instead of the joint.
Common mortar types and typical uses:
| Mortar | Minimum strength (approx.) | Typical use |
|---|---|---|
| Type O | 350 psi | Soft older brick and historic masonry, or where the original mortar was Type O |
| Type N | 750 psi | General repointing and many modern brick chimneys |
| Type S | 1,800 psi | Harder masonry or conditions where a stronger mix is specified |
| Lime mortar (Type K) | Very low, little or no Portland cement | Heritage masonry originally laid in lime |
Older Vancouver homes need extra care. Many homes built before about 1940 were laid with soft, lime-based mortar. On those chimneys a modern high-cement mix can do more harm than good. Before repairing, a mason should identify the existing mortar and match it for strength, breathability and colour. In practice that often means Type O or a lime-based mix on older, softer brick, and Type N on newer, harder brick. Add one or two sentences on how Red Brick actually tests and matches mortar, e.g. a test patch or sample match.
For the technical background, see ASTM C270, the standard that defines these mortar types, and the National Park Service’s Preservation Brief 2, Repointing Mortar Joints in Historic Masonry Buildings, link to the current NPS page after checking it resolves.
Source note: the psi values come from standard repointing specifications (Type O 350, N 750, S 1,800). Have your mason confirm the table matches how they work before it goes live.
How Much Does Chimney Mortar Repair Cost in Vancouver?
Chimney mortar repair cost depends on how many joints need work, whether the chimney is brick or stone, and above all how hard it is to reach. All prices below are in CAD and are starting points for Metro Vancouver, not quotes.
| Repair type | Typical cost range (CAD) | Notes |
|---|---|---|
| Spot mortar repair, brick (small area) | $300 – $700 | A few joints, easy roof or ground access |
| Spot mortar repair, stone (small area) | $450 – $900 | More labour per joint than brick |
| Chimney mortar cap (crown) repair | $350 – $900 | Depends on cap size and crack depth |
| Full repointing (all joints) | $500 – $3,500 | Whole-chimney scope. See the chimney repointing cost guide |
What moves the price:
- Access. Work above the roofline needs safe roof access, and anything above one storey usually adds scaffolding or staging cost.
- Chimney height and roof pitch. A tall chimney on a steep roof takes more setup and more time.
- Brick or stone. Irregular stone joints take longer than uniform brick joints.
- How much has failed. A handful of joints is a spot repair; widespread damage points to repointing.
- Mortar match. Colour and strength matching on older masonry takes more time than a standard mix.
- Related repairs found at inspection. Flashing, crown or flue problems can change the scope.
These figures are a starting point. The only way to get an accurate price is a site inspection, because roof access and chimney height change labour time significantly. For wider pricing, see our 2026 chimney repair cost guide [→ /chimney-repair-cost-vancouver-2026-guide/].
Align your numbers before publishing. Today the 2026 cost guide lists minor crown repair at $200–$700, the chimney masonry repairs page says small repointing starts around $800, and the “best time” post lists crown repair at $300–$800. Pick one set of figures and update all four pages so the site doesn’t contradict itself.erial, see our chimney repointing cost guide and our 2026 chimney repair cost guide.
Mortar Repair vs. Repointing vs. Tuckpointing vs. Rebuild
These terms get used interchangeably, but they describe different scopes of work:
- Mortar repair addresses specific damaged joints or the cap only. It is the fastest and least expensive option.
- Repointing removes and replaces mortar across the entire chimney, joint by joint. It is typically recommended once damage covers more than roughly 20–25% of the visible mortar.
- Tuckpointing is a finishing technique used with repointing, using two mortar colours to create the look of fine joints. In Vancouver it typically adds roughly 15–20% to a standard repointing job.
- Rebuild dismantles and reconstructs part or all of the chimney, usually because the bricks or stones themselves are damaged, not just the mortar. See chimney reconstruction [→ /chimney-reconstruction/].
Not sure which one your chimney needs? Our guide on chimney repair vs. rebuild walks through how that decision gets made.category your chimney falls into, our guide on chimney repair vs. rebuild walks through how that decision gets made, and our brick chimney repair guide covers the full range of brick-specific repair options.
How a Mason Repairs Chimney Mortar, Step by Step
A proper mortar repair follows the same sequence regardless of chimney material:
- Inspection. Identify every affected joint, not just the visible ones, along with the crown, flashing and flue where relevant.
- Removal. Grind or chisel out damaged mortar to a clean, consistent depth, usually 20–25 mm, without chipping the surrounding brick or stone.
- Cleaning and dampening. Brush out dust and debris, then dampen the joints so the old masonry doesn’t pull water out of the new mortar.
- Mixing. Match mortar type, strength and colour to the original.
- Packing and tooling. Fill the joint in layers for deeper gaps, then tool it to match the existing joint profile.
- Curing. Allow the mortar to cure before the chimney is exposed to heavy rain or used.
- Sealing and clean-up. Apply a breathable water repellent where appropriate and clear all debris.
How Long Does Chimney Mortar Repair Take?
Spot repairs of a few joints are usually completed in a single visit, often within half a day to a day. A mortar cap repair is typically similar. Repointing a whole chimney takes longer, commonly one to three days depending on height, access and weather.
Weather affects scheduling. Mortar shouldn’t be placed in heavy rain or freezing conditions, so wet-season work can shift by a day or more. Fresh mortar also needs time to cure; avoid using the chimney for at least 24 hours, or longer if the mortar manufacturer or your mason specifies. For help planning around the weather, see the best time of year for chimney repair in Vancouver
Real Chimney Mortar Repair Jobs in the Lower Mainland
Here are three recent jobs, with what we found, what we did and what it cost.
Repeat this card three times, one per job. Use different cities and a mix of brick and stone if possible.
| Job card field | Fill in |
|---|---|
| Location | City or neighbourhood, e.g. Burnaby |
| Home and chimney | Brick or stone, approximate height, storeys, age of home |
| What we found | Specific problem, e.g. crumbling joints on the north face, cracked mortar cap |
| What we did | Scope, mortar type used and why |
| Time on site | Real duration |
| Cost (CAD) | Real price or range |
| Photos | Before, during and after. Each with its own alt text and a caption |
If you can’t gather at least two real jobs, delete this section and the “real examples” wording in the intro. Do not invent examples or prices. Google’s spam policies target content without real value, and an unsupported claim hurts the page more than it helps.
DIY vs. Professional Mortar Repair
Pre-mixed mortar repair products are sold at most hardware stores, and for a single small crack at ground level, a careful DIY patch isn’t unreasonable. But chimney mortar repair usually isn’t a good DIY candidate for three reasons: working at roof height carries real fall risk, matching mortar mix and colour to older masonry takes experience, and a poorly matched or poorly cured patch can trap moisture behind it and make the underlying damage worse rather than better. For anything above single-storey ground access, or any repair involving the cap or flashing, a licensed masonry contractor is the safer call.
If you do patch a small ground-level crack, work from the ground only: scrape out loose mortar, brush out the dust, dampen the joint, pack in a matching mortar mix with a pointing trowel, and tool it flush with the surrounding joints. Check the product label for cure time before the chimney is used. For anything above single-storey ground access, or any repair involving the cap or flashing, hire a licensed masonry contractor.
Where We Repair Chimney Mortar
Searching for chimney mortar repair near you? Red Brick Chimney Services repairs brick and stone chimney mortar across Vancouver, Burnaby, Surrey, Richmond, Coquitlam, New Westminster, Port Moody, Port Coquitlam and North Vancouver. Our office is in Burnaby. Every job starts with an on-site inspection so you get a firm quote before any work begins. See our project gallery for examples of completed mortar repair and repointing.
Chimney Mortar Repair FAQ
How long does chimney mortar repair last?
A properly matched and cured repair can last many years, but there’s no single figure. It depends on how well the mortar matches the original, the chimney’s orientation and exposure, and whether the crown and flashing above are sound. Industry cost guides suggest brick and stone mortar is typically reassessed every 25 to 30 years, and shaded Lower Mainland chimneys may need attention sooner.
Can I repair chimney mortar myself?
Small ground-level cracks can sometimes be patched with pre-mixed mortar. Roof-level repairs, mortar cap repairs and colour-matched work are best left to a professional mason, for both safety and a durable result. Never climb onto the roof to inspect or patch.
What’s the difference between mortar repair and repointing?
Mortar repair fixes specific damaged joints or the cap. Repointing replaces the mortar across the whole chimney and is used once damage is widespread, usually when more than about 20–25% of the joints have failed.
Is tuckpointing the same as repointing?
Not exactly. Repointing is the job of removing and replacing mortar joints. Tuckpointing is a finishing technique that uses two mortar colours to create the look of very fine joints, and it typically adds roughly 15–20% to a standard repointing job in Vancouver.
How much does chimney mortar cap repair cost?
In the Lower Mainland, chimney mortar cap repair typically runs $350–$900 CAD, depending on cap size and whether it needs resealing or a rebuild.
Can I use my fireplace after chimney mortar repair?
Not straight away. Fresh mortar needs time to cure. A common guideline is to avoid using the chimney for at least 24 hours, or longer if the mortar manufacturer or your mason specifies. Your mason will confirm when it’s safe.
How do I know if I need mortar repair or full repointing?
If the damage is limited to a few joints or the cap, spot repair is usually enough. If more than roughly 20–25% of the visible mortar is cracked, crumbling or missing, repointing the whole chimney is typically the better long-term value. An on-site inspection settles it.
Will mortar repair stop my chimney from leaking?
Only if the mortar is the source. Water stains near a chimney can also come from failed flashing, a cracked crown or a missing cap. An inspection traces the leak to its source so you’re not paying to repair the wrong part.
Does home insurance cover chimney mortar repair?
It depends on the cause: sudden storm damage may be covered, while gradual deterioration usually isn’t. Our guide on home insurance and chimney repair breaks this down in detail.
Is stone chimney mortar repair more expensive than brick?
Usually, yes. Stone joints are irregular in size and take more time per linear foot to repair properly than the more uniform joints on a brick chimney.
Get a Chimney Mortar Repair Quote
Cracked or crumbling mortar costs more to fix the longer water gets in. If you’re seeing gaps, staining or loose bricks, contact Red Brick Chimney Services or call (778) 668-7636 for an on-site inspection and a firm quote on brick or stone chimney mortar repair anywhere in the Lower Mainland. You can also browse our chimney masonry repair services, chimney repair services and masonry services.