If you’ve noticed water dripping into your fireplace, damp patches on the ceiling near your chimney, or a musty smell coming from your hearth after a rainstorm, you’re not alone. Chimney leaks are one of the most common — and most misunderstood — home repair problems in the Lower Mainland. Vancouver’s climate, with its heavy rainfall from October through April, makes chimneys here especially vulnerable to water intrusion.
The tricky part? A leaking chimney rarely announces itself clearly. Water has a way of travelling far from its point of entry, which means a leak at the top of your chimney might not show up as a stain until it’s already soaked through your attic, insulation, and drywall. By then, you’re often dealing with far more than just a chimney problem.
This guide covers everything Vancouver homeowners need to know: why chimneys leak, where to look, how to fix each cause, and when to call a professional chimney repair specialist rather than tackling it yourself.
Understanding Why Vancouver Chimneys Are Especially at Risk
Before diving into specific causes, it helps to understand why chimneys are so vulnerable to moisture damage in the first place — and why Vancouver’s climate makes that vulnerability worse.
A chimney is essentially a masonry column that extends through your roof and sits fully exposed to the elements 365 days a year. It deals with heat from below and cold, wet weather from above. The bricks, mortar, and cement that make up a typical chimney are all porous to varying degrees, meaning they absorb moisture like a sponge during rain events.
In Vancouver and the surrounding area — including Burnaby, North Vancouver, Surrey, and Coquitlam — annual rainfall averages between 1,100 mm and 1,600 mm depending on location. That’s a relentless amount of water hammering a structure that’s baked by the sun through summer and then saturated through fall and winter. Freeze-thaw cycles in the shoulder seasons (late fall and early spring) accelerate deterioration further, as water trapped inside bricks and mortar expands when it freezes and cracks the material apart from within.
All of this means that a chimney that was perfectly serviceable a few years ago can develop serious moisture problems fairly quickly — especially if routine maintenance has been skipped.
8 Common Causes of a Leaking Chimney (and How to Fix Each One)
1. Missing or Damaged Chimney Cap
The chimney cap is the metal cover that sits at the very top of your flue opening. It’s the chimney’s first and most important line of defence against rain, and if it’s missing, broken, or improperly fitted, water will pour directly into the flue every time it rains.
A missing chimney cap isn’t just a leak risk — it also invites birds, squirrels, and raccoons to nest inside your flue, which creates additional blockage and fire hazards.
What to look for: Look up at your roofline from the ground. If you can’t see a cap sitting over the flue opening, or if you can see one that’s visibly rusted, cracked, or sitting askew, that’s your problem.
How to fix it: A stainless steel chimney cap with a mesh skirt is the gold standard. Galvanized caps are cheaper but rust within a few years in Vancouver’s wet climate — stainless steel is well worth the extra investment. If you’re comfortable on a roof, this is one of the few chimney repairs that a handy homeowner can manage themselves. Make sure the cap fits securely over the full flue opening and is fastened properly. If you have multiple flues, each one needs its own cap.
Cost estimate: $150–$500 installed, depending on flue size and cap style.
2. Cracked or Deteriorated Chimney Crown
The chimney crown (sometimes called the chimney wash) is the mortar slab that covers the top of the chimney structure, surrounding the flue liner. Think of it as the chimney’s roof. It slopes slightly outward to direct water away from the flue and off the sides of the chimney.
When the crown cracks — which it will, eventually, due to thermal expansion, freeze-thaw cycling, and general aging — water seeps through those cracks and runs down inside the chimney structure. This is one of the most common causes of a leaking chimney in older Vancouver homes.
What to look for: Visible cracks running across the top of your chimney’s mortar slab. Even hairline cracks should be taken seriously; they widen quickly with each winter freeze-thaw cycle.
How to fix it: Small, surface cracks (less than about 3mm wide) can sometimes be repaired with a flexible crown sealant or brushable crown coat product. These products are formulated to flex with thermal movement and bond well to existing mortar. For larger cracks or a crown that’s structurally compromised, the right fix is to chip out the old crown entirely and pour a new one using a cement-based mix with appropriate reinforcement. This is not a DIY job for most homeowners — a faulty repair that fails the following winter will leave you in a worse position than before.
Cost estimate: $400–$2,200 depending on severity and accessibility.
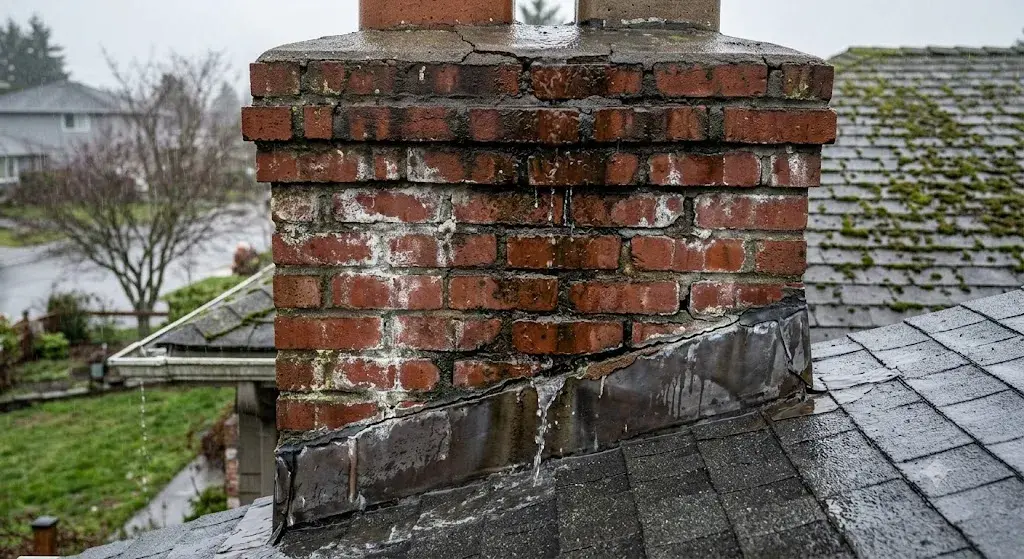
3. Damaged or Improperly Installed Chimney Flashing
Flashing is the waterproof metal barrier — typically aluminum, galvanized steel, or copper — that seals the joint where your chimney meets your roof. It’s installed in two layers: a base layer (step flashing) that weaves between roof shingles, and a counter flashing that’s embedded into the chimney mortar and laps over the step flashing.
When flashing fails, water doesn’t just drip into the flue — it enters the gap between the chimney and the roof deck, which means it can spread across a large area of your ceiling. A flashing leak often gets mistaken for a general roof leak, which is why homeowners sometimes replace shingles unnecessarily before the real culprit is identified.
Flashing fails for several reasons: the sealant along the edges dries out and shrinks, mortar joints holding the counter flashing loosen, or the flashing itself corrodes. In Vancouver, galvanized steel flashing has a limited lifespan because of constant moisture exposure — it can start to rust within 10–15 years.
What to look for: Water stains on the ceiling adjacent to the chimney (not directly below it), visible rust staining running down the chimney exterior, or gaps between the flashing and the chimney masonry.
How to fix it: Minor flashing repairs — re-sealing lifted edges or applying new caulk to gaps — are sometimes feasible as a temporary measure, but they rarely last more than a season. A proper fix involves removing the old flashing and installing new copper or stainless steel step and counter flashing. This requires coordinating both roofing and masonry work, which is one reason this repair should generally be left to professionals.
Cost estimate: $400–$1,600 for flashing replacement.
4. Spalling Brick and Deteriorated Mortar Joints
The bricks and mortar joints that make up your chimney are porous by nature. Over time, especially in a wet climate like Vancouver’s, moisture absorption and freeze-thaw cycling cause bricks to crack, flake, and break apart — a process called spalling. When bricks spall, they expose more raw surface to moisture, which accelerates the damage exponentially.
Mortar joints are usually the first to go. Mortar is softer than brick and erodes over decades of weather exposure. When the mortar between bricks recedes or crumbles, it opens direct pathways for rainwater to enter the chimney structure. This is sometimes called “open joints,” and it’s extremely common in Vancouver chimneys that are more than 30–40 years old.
What to look for: Brick chunks or fragments on the roof around your chimney. Red or orange staining on the chimney exterior (this is iron oxide from corroding bricks, not just dirt). Visibly recessed or crumbling mortar lines when you look closely at the brickwork.
How to fix it: The repair process for deteriorated mortar joints is called tuck-pointing or repointing. It involves grinding out the old mortar to a consistent depth and packing in fresh mortar to match the existing profile. When done correctly, repointing can add decades to a chimney’s life. Severely spalled bricks need to be removed and replaced. After repointing, applying a penetrating masonry waterproofing sealer is highly recommended — especially in Vancouver — to reduce future moisture absorption without trapping vapour inside the bricks.
Cost estimate: $500–$2,500+ depending on the extent of damage.
5. Condensation Inside the Flue
This cause often surprises homeowners because it doesn’t involve any structural failure at all. When you burn a gas appliance (like a gas fireplace insert or gas furnace) through an older, unlined masonry chimney, the combustion gases are much cooler and more humid than the gases produced by a traditional wood fire. As these cool, moist gases travel up a cold masonry flue, water vapour condenses on the interior walls and runs back down — eventually showing up as moisture in your fireplace or around the chimney base.
This is particularly common in Vancouver homes that have converted from wood-burning to gas appliances. The chimney was sized for a woodstove’s hotter draft, and the new appliance simply can’t push enough heat to keep the flue warm.
What to look for: Moisture appearing in the fireplace even during dry weather. A persistent musty or sulphurous smell around the hearth. No obvious external damage to the cap, crown, flashing, or masonry.
How to fix it: The solution is to install a correctly sized stainless steel liner inside the existing masonry flue. The liner narrows the effective flue diameter so that the appliance’s exhaust gases stay warmer and are expelled before they cool enough to condense. This is not a DIY project — a certified chimney technician or WETT (Wood Energy Technology Transfer) inspector can assess the right liner size for your appliance and installation.
Cost estimate: $1,500–$4,000 for a stainless steel liner installation.
6. Cracked or Missing Chimney Chase Cover
If your home has a prefabricated fireplace (factory-built, metal-insert style) rather than a traditional masonry fireplace, your chimney is probably a wood-framed “chase” clad in siding or stone veneer. At the top of this chase sits a flat metal cover called a chase cover, which protects the interior of the chase from rain.
Chase covers are usually made of galvanized steel, and in Vancouver’s climate, they rust out faster than most homeowners expect — sometimes within 10 years. A rusted chase cover develops holes and seams that allow water to pool and drip into the chase cavity, which can cause rot throughout the wood framing.
What to look for: Rust staining running down the exterior of your chimney chase. Water sounds inside the chimney when it rains. Soft or spongy drywall near the base of the chase.
How to fix it: Replace the galvanized cover with a stainless steel or copper chase cover. This is one of the more straightforward chimney repairs for a professional and is worth doing proactively even before a visible leak develops if your current cover is more than 10–15 years old.
Cost estimate: $200–$700 installed.
7. Cracked or Damaged Flue Liner
Inside every chimney runs a flue liner — either clay tile, cast-in-place concrete, or stainless steel — that contains combustion gases and directs them safely out of the home. Over time, clay tile liners crack due to thermal shock, earthquake movement (minor tremors are not uncommon in the Lower Mainland), or freeze-thaw action from moisture that has already entered the system.
A cracked liner primarily poses a carbon monoxide and fire safety hazard, but it also allows moisture to migrate through the cracks into the surrounding masonry, contributing to leaks, spalling, and mortar deterioration.
What to look for: This one is difficult to see without a chimney camera inspection. Warning signs include unexplained dampness in the chimney masonry, white efflorescence (salt deposits) on the interior walls, or a chimney sweep who notices deterioration during an annual cleaning.
How to fix it: Cracked clay tile liners can sometimes be repaired with a cast-in-place liner system, or the tiles can be bypassed entirely with a stainless steel liner. A WETT-certified inspector can advise on the best approach for your specific situation.
Cost estimate: $1,500–$5,000+ depending on repair method and chimney height.
8. Poor Original Construction or Improper Flashing Installation
Finally, it’s worth acknowledging that some chimneys leak not because they’ve deteriorated over time, but because they were never correctly built or flashed to begin with. This is more common than you might expect, particularly in homes built during construction booms where speed was prioritized over craftsmanship.
Signs of original construction problems include flashing that was simply caulked rather than properly counter-flashed into the mortar, a chimney crown that was poured flat rather than with a slope, or a cap that’s undersized for the flue.
If you’ve moved into a home and the chimney has been leaking since practically day one, or if multiple repairs haven’t solved the problem, poor original construction may be the underlying issue.
How to Tell If Your Chimney Is Actually the Source of the Leak
One of the most frustrating things about a leaking chimney is that the water often appears somewhere other than the actual entry point. Here’s a quick way to reason through the source:
It’s likely your chimney if:
- Water appears in the fireplace after rain, but not after sustained dry weather
- Staining is concentrated on walls directly adjacent to or below the chimney
- You can see visible damage to the cap, crown, flashing, or brickwork
- The leak is seasonal and correlates clearly with heavy rainfall or snowmelt
It might be your roof instead if:
- Water appears far from the chimney, or in multiple areas of the ceiling
- The leak occurs during wind-driven rain rather than straight downpours
- Your shingles are clearly at the end of their life
When in doubt, a chimney professional with a camera inspection system can often trace the water entry path definitively. Vancouver has several reputable WETT-certified chimney inspection services that can give you a clear diagnosis before you spend money on the wrong repair.
The Real Cost of Ignoring a Leaking Chimney
It’s tempting to put off chimney repairs, especially when the leak seems minor. But water damage inside a chimney is progressive — a small crack that lets in a trickle today will be a much larger crack after the next winter’s freeze-thaw cycles.
Here’s what unchecked chimney leaks can lead to:
Structural deterioration of the chimney itself. Once water penetrates masonry consistently, it begins attacking mortar joints and brick faces from within. Left long enough, a chimney can develop enough damage that it becomes unsafe — and at that point you’re looking at a partial or complete rebuild rather than a repair.
Rot and mould in your home’s structure. Water that enters through failed flashing doesn’t just stay in the chimney — it spreads across your roof deck, into your attic framing, and eventually into your ceilings and walls. Black mould is a genuine concern, particularly in Vancouver’s already-damp climate, and remediation is expensive.
Damage to your fireplace and firebox. Moisture inside the firebox corrodes the firebox liner, damper, and any steel components. It also saturates the refractory panels (the heat-resistant bricks inside the firebox) and can cause them to crack, which is a safety issue.
Higher energy costs. A damp chimney performs less efficiently. Moisture in the masonry conducts heat away from the flue, making your fireplace work harder and reducing the effective warmth it delivers.
The cost of fixing a leaking chimney when it’s first noticed almost always proves to be a fraction of what it costs to fix the collateral damage from waiting.
DIY vs. Professional Chimney Repair: What You Can and Can’t Do Safely
Reasonable DIY tasks (with proper safety precautions):
- Replacing a chimney cap (if you’re comfortable on a roof with fall protection)
- Applying chimney crown sealant to hairline cracks you can reach safely
- Applying a penetrating masonry waterproofing product to sound brickwork
- Cleaning debris and leaves from around the chimney base
Leave these to a professional:
- Flashing replacement or significant flashing repairs
- Full chimney crown replacement
- Tuck-pointing and brickwork (poor technique can cause more harm than good)
- Flue liner inspection, repair, or replacement
- Any work involving gas appliances or WETT-required inspections
In British Columbia, gas fireplace work must be done by a licensed gas contractor. WETT inspections for wood-burning systems are required for most home sales and mortgage refinancing. Trying to shortcut these requirements can create insurance and liability issues down the road.
Chimney Waterproofing: A Smart Preventive Step for Vancouver Homes
One thing that’s often overlooked in chimney maintenance is proactive waterproofing. A vapour-permeable masonry sealer applied to the exterior of your chimney can significantly reduce moisture absorption without trapping water vapour inside the bricks (which would cause faster deterioration, not less).
The key word here is “vapour-permeable” — avoid standard concrete sealers or paint, which trap moisture inside the masonry. Products specifically formulated for chimneys allow water vapour to escape from within while blocking liquid water from entering from outside.
Given Vancouver’s rainfall levels, having your chimney waterproofed every 5–7 years as part of a routine maintenance program is genuinely worthwhile. It’s one of the most cost-effective things you can do to extend the life of a masonry chimney.
How Often Should Vancouver Homeowners Have Their Chimney Inspected?
The National Fire Protection Association (NFPA) and most Canadian chimney safety organizations recommend a chimney inspection at least once per year, regardless of how often you use your fireplace. This is especially true in Vancouver, where the wet season takes a consistent toll on chimney structures.
An annual inspection should cover:
- The condition of the cap, crown, and flashing
- The integrity of mortar joints and brickwork
- The interior flue liner (via camera inspection if needed)
- The firebox, damper, and smoke chamber
If you use a wood-burning fireplace regularly, the inspection should also include cleaning to remove creosote buildup — a fire hazard that accumulates in the flue with every fire.
Many chimney companies in the Vancouver area offer combined inspection and cleaning packages. Getting this done in late summer or early fall — before the rainy season begins — is ideal timing, as any repairs identified can be completed while the weather is still workable.
Quick Reference: Chimney Leak Causes and Solutions
| Problem | Most Likely Fix | DIY Possible? | Estimated Cost |
| Missing or broken chimney cap | Replace with stainless steel cap | Yes (with care) | $150–$500 |
| Cracked chimney crown | Crown sealant (minor) or full rebuild | Minor only | $400–$2,200 |
| Failed chimney flashing | New step and counter flashing | No | $400–$1,600 |
| Spalling brick / open mortar joints | Tuck-pointing + waterproofing | No | $500–$2,500+ |
| Condensation in flue | Stainless steel liner installation | No | $1,500–$4,000 |
| Rusted chase cover | Stainless steel replacement | No | $200–$700 |
| Cracked flue liner | Liner repair or replacement | No | $1,500–$5,000+ |
Final Thoughts: Don’t Wait on a Leaking Chimney
A leaking chimney in Vancouver is not a problem that fixes itself, and the rainy season doesn’t give you much time to deliberate. Whether it’s a simple cap replacement or a more involved flashing repair, addressing the issue promptly protects your home from the kind of water damage that turns a $500 repair into a $10,000 renovation.
If you’re not sure where your leak is coming from, start with a professional chimney inspection. A qualified WETT-certified inspector in Vancouver can use a camera system to trace the water entry point definitively and give you a clear, itemized repair estimate. From there, you can make an informed decision about what to prioritize and whether to tackle any of it yourself.
Your chimney is a significant part of your home’s structure. Treat it like one.
Looking for a certified chimney repair professional in Vancouver? Search for WETT-certified inspectors through the WETT Inc. directory at wettinc.ca, or ask your contractor to confirm their certifications before any work begins.